Making the Soup
Last week I wrote about our experience with the Jaramillo Soup. The beauty of this soup is that you can make it with whatever you have in your fridge, so it's economical and uncomplicated. When I started making it for Zach, I began by giving him 2 oz. three times per day, mixed with breast milk (plus nursing on-demand the rest of the day). This meant that I was making about 1/3 of the recipe featured here. I gradually increased the amount of soup based on his demands and hunger level. By six months of age, he's drinking four 9-oz. bottles of soup each day (plus purees for lunch and dinner made from other things like sweet potato, corn & spinach, etc. to practice spoon feeding).* When you see how much he eats you'll find it shocking and cruel that anyone would expect THIS big baby to be on a breast milk-only diet until he turned six months.
*Since I started this post a week ago (hello, busy life) I have weaned Zach from the bottles and I'm spoon-feeding him 100%. This is described at the end of the post.
Ingredients:
Vegetables
Fruits
Water: Ideally use spring water or reverse osmosis water, but at least use purified water (no tap water!!)
Equipment: pressure cooker (or regular soup pot, but it takes longer)*, blender, ceramic or glass bowl, glass bottles, cross-cut nipples (use a sharp knife to cut a cross in the nipple so the soup will go through).
*I have a T-Fal pressure cooker; it's affordable and works really well.
Instructions:
The night before, measure out the legumes and grains and leave them soaking in two cups of purified water in a glass or ceramic bowl (no plastic, even if it's BPA-free!). You can
 You can chop up the veggies or cook 'em whole.
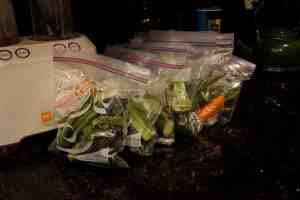
also prep baggies with washed and pre-measured veggies for the whole week (note: if your veggies are not organic, make sure you disinfect them with grapefruit seed extract). Do the same thing for the animal protein; portion the meats, wrap them in parchment paper and then put them in baggies to freeze.
 I prep the veggies every Sunday.
In the morning, pour the legumes and grains into your pot with the water they soaked in, and add the vegetables and animal protein. DO NOT put in the fruits or oil, and DO NOT use any sweeteners or seasonings.
Cover the pressure cooker and turn on the heat as hight as it will go. When it has built up pressure and starts steaming, turn down the heat to medium-low (just enough to maintain pressure) and set a timer for 15 minutes. Alternately, you can pressure cook the grains and legumes for 10 minutes, bring down the pressure, add the veggies and protein, increase the pressure again, and pressure cook for five more minutes (I just find this to be more of a hassle). If you are using a regular pot, you will have to let the grains
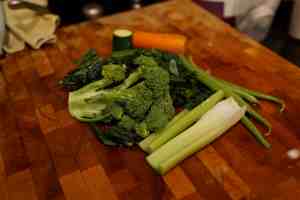
 Grains, legumes, veggies and animal protein ready to cook.
and legumes cook for about 45 minutes, then add the veggies and cook for an additional 15 minutes.
Meanwhile, put the fruits and oil in a blender. When the timer goes off, quick-release the pressure and transfer all the soup ingredients from the pot to the blender. Blend on the highest setting for at least 30 seconds, or until everything has been perfectly pureed because little chunks of food can clog the nipples. (I bought a $15 Oster blender with a glass blender jar, and it works great on
"liquify" mode). If the soup is too thick, add a little more water or some 100% organic fruit juice (I like prune, pear, or apple). It takes a few days to get the consistency just right; have a toothpick handy to unclog the nipple if necessary.
Pour the soup into the bottles, screw on the nipples, put on the caps and put the bottles immediately into the fridge. Try to put them on a bottom shelf, not in the door racks, so that they'll stay very cold. If your fridge isn't very cold, put ice in a large container and nestle the bottles among the ice, and then put the whole thing in the fridge. Failure to cool down the bottles can cause your baby to have gas, especially with the afternoon and evening feedings.
 Ready to blend...
It sounds like a huge hassle to make the soup, but it's actually quite quick once you have a system. It takes me about 30 minutes each morning, and I can rest assured knowing that my child has wholesome, healthy, and home-cooked meals for the rest of the day.
CAVEAT: You MUST makethe soup fresh each day. This soup should not be stored overnight nor should it be frozen. Your child deserves fresh food to get off to a healthy start!
To heat up the bottles, you can use a bottle warmer (I have the Dr. Brown's warmer and it works great if you set it for 5:30 minutes). Always make sure to shake the bottle thoroughly to even out the soup temperature and test the soup on your hand before giving to baby. The soup should be served warm.
 Yummy!
If you are going out, take the soup in a thermal bag with ice and make sure it stays as cold as possible. To reheat on the go, ask for a large cup half-filled with hot water and immerse the bottle for 5-7 minutes, then shake.
It is also possible to make the soup thicker and spoon-feed it to baby. Now that Zach is eating really well with a spoon, I am making three separate purees from the items I cook (I still cook everything in one pot but I use less liquid during blending to ensure a thicker consistency):
This soup has changed our lives for the better. Our child is happy, healthy, strong, and sleeps like a champ. It's never too late to start making it! If you have any questions on how to make it, please e-mail me or leave a comment.
 The first time we tried spoon-feeding the soup... It's gotten a lot better since then!
*Since I started this post a week ago (hello, busy life) I have weaned Zach from the bottles and I'm spoon-feeding him 100%. This is described at the end of the post.
Ingredients:
Vegetables
- 1 chard leaf
- 1 kale leaf
- 1 lettuce leaf
- 1/2 zucchini
- 5 green beans
- 1 large broccoli floret
- 1 celery stalk
- 1/3 sweet potato
- 1 tbsp. mung or azuki beans (or any beans you have)
- 1 tbsp. green lentils (or yellow or brown)
- 1 tbsp. brown rice
- 1 tbsp. quinoa (doesn't need to be soaked)
- Dark meat chicken, grass-fed beef, chicken livers* or fatty fish (i.e. salmon)
Fruits
- 1/2 avocado
- 1 sliver of papaya (approximate size = three of your fingers)
- 6 prunes
- five chunks of mango, 1/2 peach, handful of blueberries, OR any other seasonal fruits without the peel (note: NO bananas, strawberries, or citrus)
Water: Ideally use spring water or reverse osmosis water, but at least use purified water (no tap water!!)
Equipment: pressure cooker (or regular soup pot, but it takes longer)*, blender, ceramic or glass bowl, glass bottles, cross-cut nipples (use a sharp knife to cut a cross in the nipple so the soup will go through).
*I have a T-Fal pressure cooker; it's affordable and works really well.
Instructions:
The night before, measure out the legumes and grains and leave them soaking in two cups of purified water in a glass or ceramic bowl (no plastic, even if it's BPA-free!). You can
 You can chop up the veggies or cook 'em whole.
also prep baggies with washed and pre-measured veggies for the whole week (note: if your veggies are not organic, make sure you disinfect them with grapefruit seed extract). Do the same thing for the animal protein; portion the meats, wrap them in parchment paper and then put them in baggies to freeze.
 I prep the veggies every Sunday.
In the morning, pour the legumes and grains into your pot with the water they soaked in, and add the vegetables and animal protein. DO NOT put in the fruits or oil, and DO NOT use any sweeteners or seasonings.
Cover the pressure cooker and turn on the heat as hight as it will go. When it has built up pressure and starts steaming, turn down the heat to medium-low (just enough to maintain pressure) and set a timer for 15 minutes. Alternately, you can pressure cook the grains and legumes for 10 minutes, bring down the pressure, add the veggies and protein, increase the pressure again, and pressure cook for five more minutes (I just find this to be more of a hassle). If you are using a regular pot, you will have to let the grains
 Grains, legumes, veggies and animal protein ready to cook.
and legumes cook for about 45 minutes, then add the veggies and cook for an additional 15 minutes.
Meanwhile, put the fruits and oil in a blender. When the timer goes off, quick-release the pressure and transfer all the soup ingredients from the pot to the blender. Blend on the highest setting for at least 30 seconds, or until everything has been perfectly pureed because little chunks of food can clog the nipples. (I bought a $15 Oster blender with a glass blender jar, and it works great on
"liquify" mode). If the soup is too thick, add a little more water or some 100% organic fruit juice (I like prune, pear, or apple). It takes a few days to get the consistency just right; have a toothpick handy to unclog the nipple if necessary.
Pour the soup into the bottles, screw on the nipples, put on the caps and put the bottles immediately into the fridge. Try to put them on a bottom shelf, not in the door racks, so that they'll stay very cold. If your fridge isn't very cold, put ice in a large container and nestle the bottles among the ice, and then put the whole thing in the fridge. Failure to cool down the bottles can cause your baby to have gas, especially with the afternoon and evening feedings.
 Ready to blend...
It sounds like a huge hassle to make the soup, but it's actually quite quick once you have a system. It takes me about 30 minutes each morning, and I can rest assured knowing that my child has wholesome, healthy, and home-cooked meals for the rest of the day.
CAVEAT: You MUST makethe soup fresh each day. This soup should not be stored overnight nor should it be frozen. Your child deserves fresh food to get off to a healthy start!
To heat up the bottles, you can use a bottle warmer (I have the Dr. Brown's warmer and it works great if you set it for 5:30 minutes). Always make sure to shake the bottle thoroughly to even out the soup temperature and test the soup on your hand before giving to baby. The soup should be served warm.
 Yummy!
If you are going out, take the soup in a thermal bag with ice and make sure it stays as cold as possible. To reheat on the go, ask for a large cup half-filled with hot water and immerse the bottle for 5-7 minutes, then shake.
It is also possible to make the soup thicker and spoon-feed it to baby. Now that Zach is eating really well with a spoon, I am making three separate purees from the items I cook (I still cook everything in one pot but I use less liquid during blending to ensure a thicker consistency):
- A puree made from legumes, grains, a 4-minute egg yolk and some pastured butter (this is for breakfast and mid-afternoon meal)
- A puree made from veggies, animal protein, and cod liver oil (this is for lunch and dinner)
- A puree made from the fruits and avocado (this is "dessert" after each meal)
 Bottoms up!
This soup has changed our lives for the better. Our child is happy, healthy, strong, and sleeps like a champ. It's never too late to start making it! If you have any questions on how to make it, please e-mail me or leave a comment.
 The first time we tried spoon-feeding the soup... It's gotten a lot better since then!
Categories
- 3-6 (8)
- 6-9 (26)
- 9-12 (8)
- Positive Discipline (2)
- Conscious Parenting (12)
- Montessori Curriculum (9)
- Preparation of the Adult (14)
- Preparation of the Environment (11)
- Montessori Principles (11)
- Montessori Homeschooling (20)
- Language Arts (3)
- Math (3)
- Geography (2)
- Biology (1)
- History (2)
- Practical Life (1)
- Montessori Stories (4)

30 comments
Show 1 more commentLeave a comment