Gobbi Tutorial, Part II (Hanging the Gobbi)
To see Part I (Making the Gobbi mobile), click here.
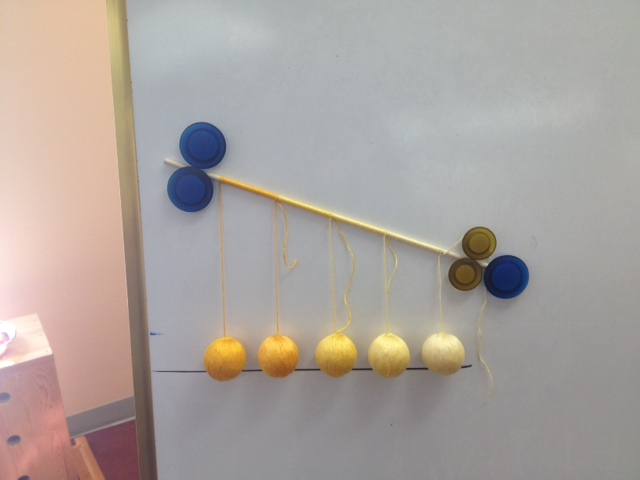
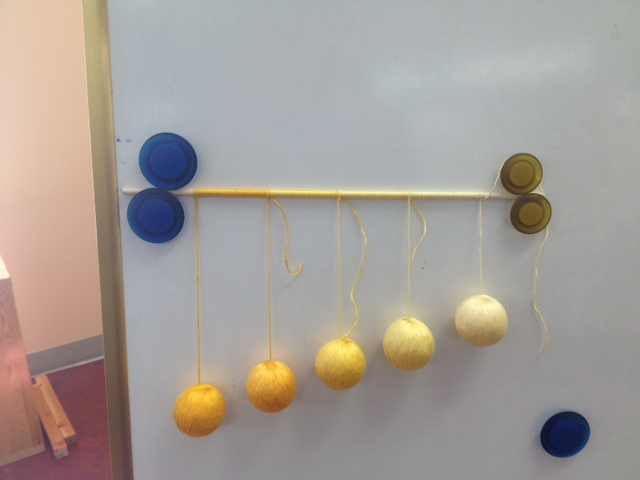
My dear friend Junnifa, who's taking the Assistants to Infancy training, was kind enough to give me guidance and sent me the two pictures that show how to hang the Gobbi mobile. I love her beautiful results! Thanks Junnifa!!! :)
Materials:
First, draw a straight line on a piece of paper or a whiteboard. Line up the completed balls from darkest (left) to lightest (right). Center the dowel over the balls. Mark the center-point of each ball onto the dowel so you know where to attach them.
Next, move the dowel about five inches away from the spheres and tilt it an an angle (a 45 degree angle is pretty good, but you don't have to be exact). The closest sphere should be about three inches from the dowel. (Note: You don't want the spheres to hang too far from the dowel because they get tangled.)

Tie the thread of each sphere to the dowel at the point you previously marked. (This is the tricky part; you might have to tape down the spheres where the thread comes out of the sphere, so you don't have them falling out of line, or get someone to help you hold the spheres while you do the tying!)
Straighten the dowel and check to see if the spheres hang in a straight diagonal line.

Trim the remaining thread where you made each knot.
Cut a piece of thread or fishing wire about twice as long as the dowel and tie it on both ends of the dowel (This will make a triangle with the dowel as the base and the thread as the two legs). Cut another piece of thread or fishing wire and tie it to the vertex of the resulting triangle. Use this thread to hang your mobile.
Optional: If you have leftover thread, you can wrap it around the dowel (see picture above).
I hope this makes sense... I'd love to see you finished creations and as always feel free to comment with questions or suggestions that could make this process even easier!
My dear friend Junnifa, who's taking the Assistants to Infancy training, was kind enough to give me guidance and sent me the two pictures that show how to hang the Gobbi mobile. I love her beautiful results! Thanks Junnifa!!! :)
Materials:
- Large piece of paper or whiteboard
- Pencil or marker
- Ruler or straight edge
- Dowel
- More embroidery thread (optional)
First, draw a straight line on a piece of paper or a whiteboard. Line up the completed balls from darkest (left) to lightest (right). Center the dowel over the balls. Mark the center-point of each ball onto the dowel so you know where to attach them.
Next, move the dowel about five inches away from the spheres and tilt it an an angle (a 45 degree angle is pretty good, but you don't have to be exact). The closest sphere should be about three inches from the dowel. (Note: You don't want the spheres to hang too far from the dowel because they get tangled.)

Tie the thread of each sphere to the dowel at the point you previously marked. (This is the tricky part; you might have to tape down the spheres where the thread comes out of the sphere, so you don't have them falling out of line, or get someone to help you hold the spheres while you do the tying!)
Straighten the dowel and check to see if the spheres hang in a straight diagonal line.

Trim the remaining thread where you made each knot.
Cut a piece of thread or fishing wire about twice as long as the dowel and tie it on both ends of the dowel (This will make a triangle with the dowel as the base and the thread as the two legs). Cut another piece of thread or fishing wire and tie it to the vertex of the resulting triangle. Use this thread to hang your mobile.
Optional: If you have leftover thread, you can wrap it around the dowel (see picture above).
I hope this makes sense... I'd love to see you finished creations and as always feel free to comment with questions or suggestions that could make this process even easier!
Categories
- 3-6 (8)
- 6-9 (26)
- 9-12 (8)
- Positive Discipline (2)
- Conscious Parenting (12)
- Montessori Curriculum (9)
- Preparation of the Adult (14)
- Preparation of the Environment (11)
- Montessori Principles (11)
- Montessori Homeschooling (20)
- Language Arts (3)
- Math (3)
- Geography (2)
- Biology (1)
- History (2)
- Practical Life (1)
- Montessori Stories (4)

6 comments
Leave a comment